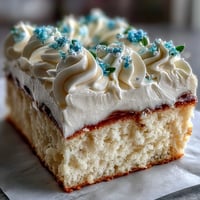
 Save to Pinterest
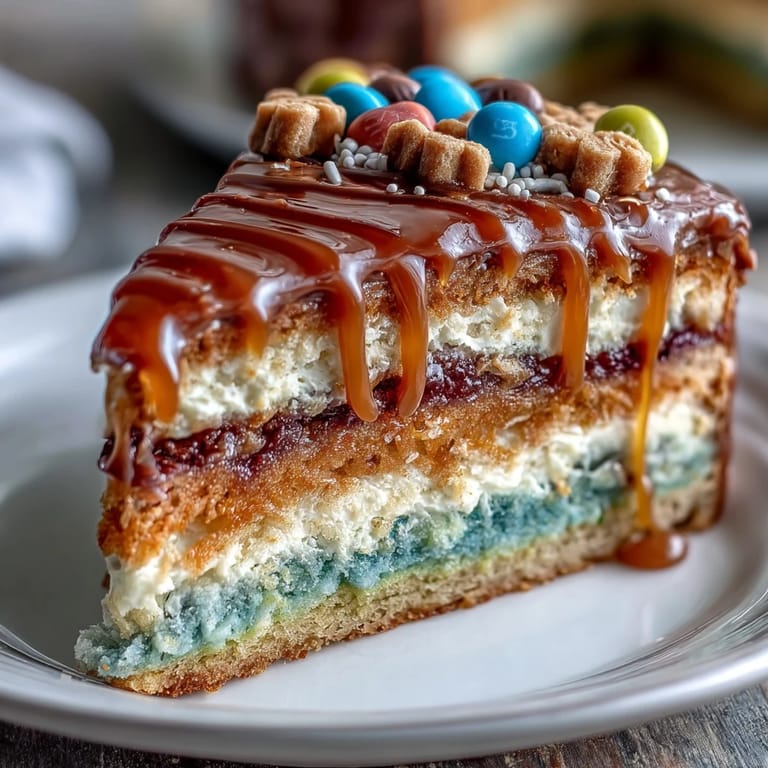
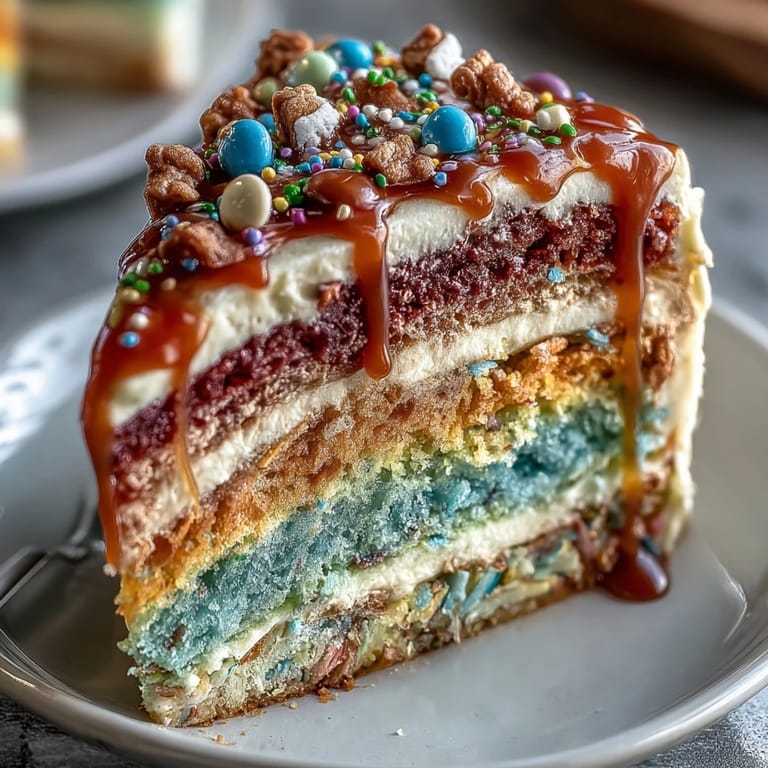
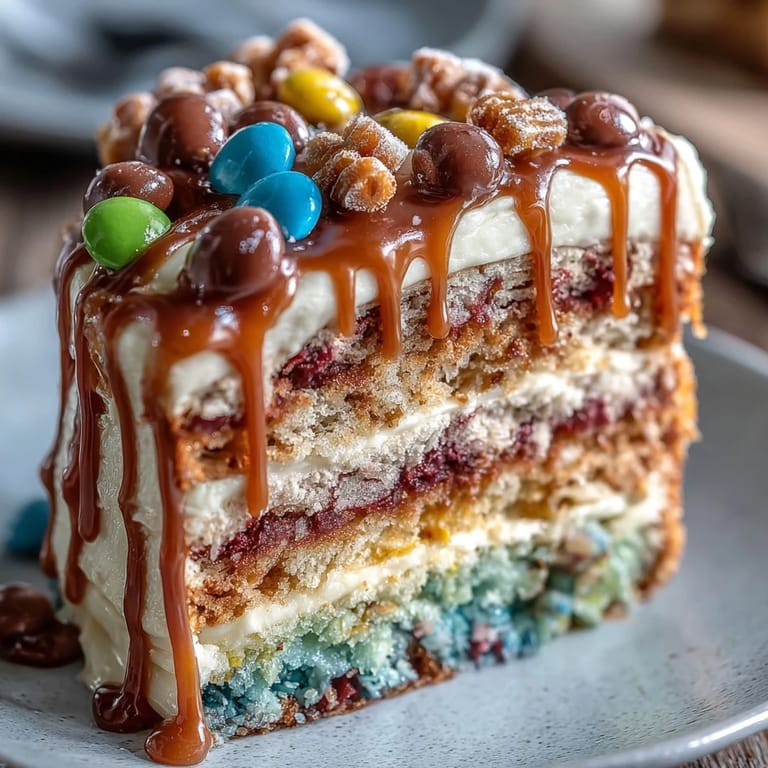
 My daughter's eyes went wide when she realized the cake we'd spent all afternoon decorating was hiding something magical inside. We'd mixed up six different colored batters, layered them with surgical precision, and she kept asking if the surprise was really in there—until the first slice revealed a cascade of gummy bears and M&Ms tumbling out onto the plate. That's when I understood why piñata cakes have become the ultimate celebration centerpiece: they deliver joy in layers, literally and figuratively.
I made this cake for my cousin's Cinco de Mayo party, and watching people's faces when they bit into it and discovered the candy center was honestly better than any store-bought dessert could ever deliver. One guest actually gasped—actually gasped—and then asked if I'd made it myself, which felt like winning the lottery as a baker.
Ingredients
- All-purpose flour: Three cups form the backbone of your cake's structure; make sure it's measured correctly by spooning and leveling, not scooping straight from the bag.
- Baking powder and baking soda: These work together to give you that light, tender crumb; don't skip sifting them with the flour or you'll end up with lumpy pockets.
- Unsalted butter: Using unsalted lets you control the salt level, and softening it to room temperature ensures smooth mixing.
- Granulated sugar: Two cups create the sweetness and help trap air for a fluffy texture when beaten with butter.
- Eggs: Room temperature eggs blend in more evenly, creating a uniform batter without streaks.
- Vanilla extract: Two teaspoons round out the flavor with warmth and depth.
- Whole milk: The alternating wet-dry method keeps your batter tender and prevents overmixing.
- Gel food coloring: Six colors (red, orange, yellow, green, blue, purple) create that stunning rainbow; gel coloring is more concentrated than liquid, so your batter stays the right consistency.
- Assorted small candies: The hidden treasure layer—use whatever makes you happy, just avoid anything too large or sticky.
- Frosting butter and powdered sugar: Softened butter and sifted powdered sugar give you silky, spreadable frosting that doesn't look gritty.
Tired of Takeout? 🥡
Get 10 meals you can make faster than delivery arrives. Seriously.
One email. No spam. Unsubscribe anytime.
Instructions
- Set yourself up for success:
- Preheat your oven to 350°F (175°C) and prep three 8-inch round pans by greasing them and lining the bottoms with parchment paper. This step might feel fussy, but it's the difference between a cake that slides out perfectly and one that sticks.
- Build your dry foundation:
- Whisk together flour, baking powder, baking soda, and salt in a medium bowl, breaking up any lumps as you go. This ensures your leavening agents are evenly distributed throughout the batter.
- Cream butter and sugar until fluffy:
- Beat softened butter and sugar for about 3 minutes until the mixture looks pale and cloud-like; this incorporates air that makes your cake tender. Stop occasionally to scrape down the bowl so nothing gets left behind.
- Add eggs one at a time:
- Crack each egg into the mixture, beating well after each addition before moving to the next; rushing this step can result in a separated, broken-looking batter that won't rise properly.
- Mix in vanilla:
- Two teaspoons of vanilla extract go in now, beating just until you don't see any streaks.
- Alternate dry and wet ingredients:
- Add your flour mixture in three additions, alternating with milk and beginning and ending with flour; this prevents overmixing, which would make your cake tough and dense. Mix on low speed just until combined after each addition.
- Divide and color your batters:
- Split the batter evenly into six bowls and add gel coloring to each one, stirring until you get a uniform color with no white streaks. The colors will deepen slightly as the cakes bake, so don't be afraid to use a bit more coloring than you think you need.
- Fill and smooth your pans:
- Pour each colored batter into its own prepared pan and smooth the tops with a spatula so they bake evenly. If you only have three pans, you'll bake in two batches, which is perfectly fine.
- Bake until golden:
- Each layer needs 15 to 18 minutes until a toothpick inserted in the center comes out clean with just a few moist crumbs. Don't open the oven door too early or your cakes might collapse.
- Cool with patience:
- Let layers rest in their pans for 10 minutes (this helps them set), then turn them out onto wire racks to cool completely. You need them fully cooled before assembly or your frosting will melt.
- Hollow out your layers:
- Using a 3-inch round cutter, carefully cut out the centers of four of your six layers, leaving the top and bottom layers whole to create a cavity for your surprise. Press straight down and give the cutter a slight twist; the cut-out piece should pop right out.
- Make your frosting:
- Beat softened butter until it's creamy and pale, then gradually add sifted powdered sugar, milk, vanilla, and salt, beating until you get a smooth, fluffy consistency. Don't rush this step; proper beating makes all the difference in texture.
- Stack and fill strategically:
- Place your purple (bottom) whole layer on a serving plate, spread a thin frosting layer, then stack the first cut-out layer on top and frost lightly. Repeat with your remaining cut-out layers, frosting between each one.
- Add your candy treasure:
- Pour your assorted candies into the center cavity created by the stacked cut-out layers, filling it generously but not overflowing. Use a mix of colors and textures for maximum visual impact when people slice into it.
- Top it off:
- Place your final whole layer (the top) over the candy-filled cavity, creating a sealed surprise inside.
- Frost the exterior:
- Frost the outside and top of the cake generously with remaining frosting, creating swirls and peaks with your offset spatula. This is where you can really have fun with colors if you want to tint portions of the frosting.
- Decorate and chill:
- Add colored frosting, sprinkles, or festive decorations as desired, then refrigerate for at least 30 minutes before slicing to make cutting cleaner and easier. Cold cake is also more stable when you plate it.
 Save to Pinterest
 There's something about watching a room full of people gasp in unison when the candy center reveals itself that makes all the careful planning worth it. This cake transforms a regular dessert moment into something genuinely memorable.
Choosing Your Candies Wisely
The best part about the piñata filling is that you can customize it completely based on what you love or what's on hand. Mini M&Ms, gummy bears, and rainbow sprinkles are classics because they're small, colorful, and won't weigh down your cake, but I've also used crushed rock candy for a sparkly effect and found that people lose their minds over it. Avoid anything sticky like caramels or taffy, anything super hard that could crack a tooth, and oversized candies that would create holes in your cavity. The goal is texture and color variety that makes people smile when they see it.
Why Room Temperature Ingredients Matter
I learned this the hard way when I once grabbed cold eggs straight from the fridge and wondered why my batter looked separated and curdled. Room temperature eggs, milk, and butter mix together smoothly because they're closer to the same temperature, which helps them emulsify properly and create that light, fluffy crumb you're after. If you forget to plan ahead, you can set cold eggs in warm water for five minutes or let milk sit on the counter for twenty minutes—it makes a noticeable difference.
Timing Your Bake Perfectly
The beauty of making this cake ahead is that you can bake the layers a day or two in advance, wrap them tightly, and assemble everything fresh on party day when you're not rushed. I've found that assembling it the morning of your event gives you the best of both worlds: fresh-tasting cake and plenty of time to chill before serving. If you're baking all six layers and only have three pans, set a timer and keep notes on which color baked when so you remember which ones need cooling.
- Layer all six colors even if you're baking in batches; having the full rainbow spectrum matters for that magical reveal moment.
- Don't skip the parchment paper in your pans; it saves you from torn or stuck cake bottoms that ruin the presentation.
- Mark your pans with a permanent marker so you remember which color is baking where if you're using the same pans multiple times.
 Save to Pinterest
 This cake is proof that the most impressive desserts don't require fancy techniques or professional equipment, just a little creativity and the willingness to try something fun. Make it for the next celebration you host and watch people's faces light up when they discover what's hiding inside.
Recipe FAQs
- → How can I achieve bright, vivid colors in the layers?
Use gel food coloring instead of liquid as it provides more intense and vibrant hues without thinning the batter.
- → What candies work best for the surprise center?
Choose small, dry candies like mini chocolate pieces, sprinkles, or gummy bears that won't melt or stick together during assembly.
- → Can the cake layers be prepared ahead of time?
Yes, layers can be baked a day ahead and stored wrapped in plastic wrap at room temperature to maintain freshness.
- → How do I prevent the layers from breaking when cutting out the centers?
Allow layers to cool completely before cutting and use a sharp round cutter for clean edges to avoid crumbling.
- → What is the best way to slice this cake for serving?
Chill the cake for about 30 minutes before slicing to help the layers and candies hold shape for cleaner cuts.